Events in a trial (feedback)
In last week’s task, the trial structure was relatively simple: Participants were shown a text stimulus and were asked to choose between two gambles. We later added a text to remind participants of which keys they could press to express their choice, as well as a “Get ready” text at the beginning of each trial.
Now, we explore slightly more complex trial structures.
In particular, we will focus on the feedback today and on conditional branching next week.
Feedback
Feedback is quite common both in perceptual and in value-based decision tasks. It can have a specific function (e.g., to drive learning) or is used simply to notify that a response was recorded and the trial is over (people like to receive feedback, and can be thus used as motivator).
Today, we are going to use the stimuli for a categorization task, taken from Spiering & Ashby (2008). You can download them using this Dropbox link.
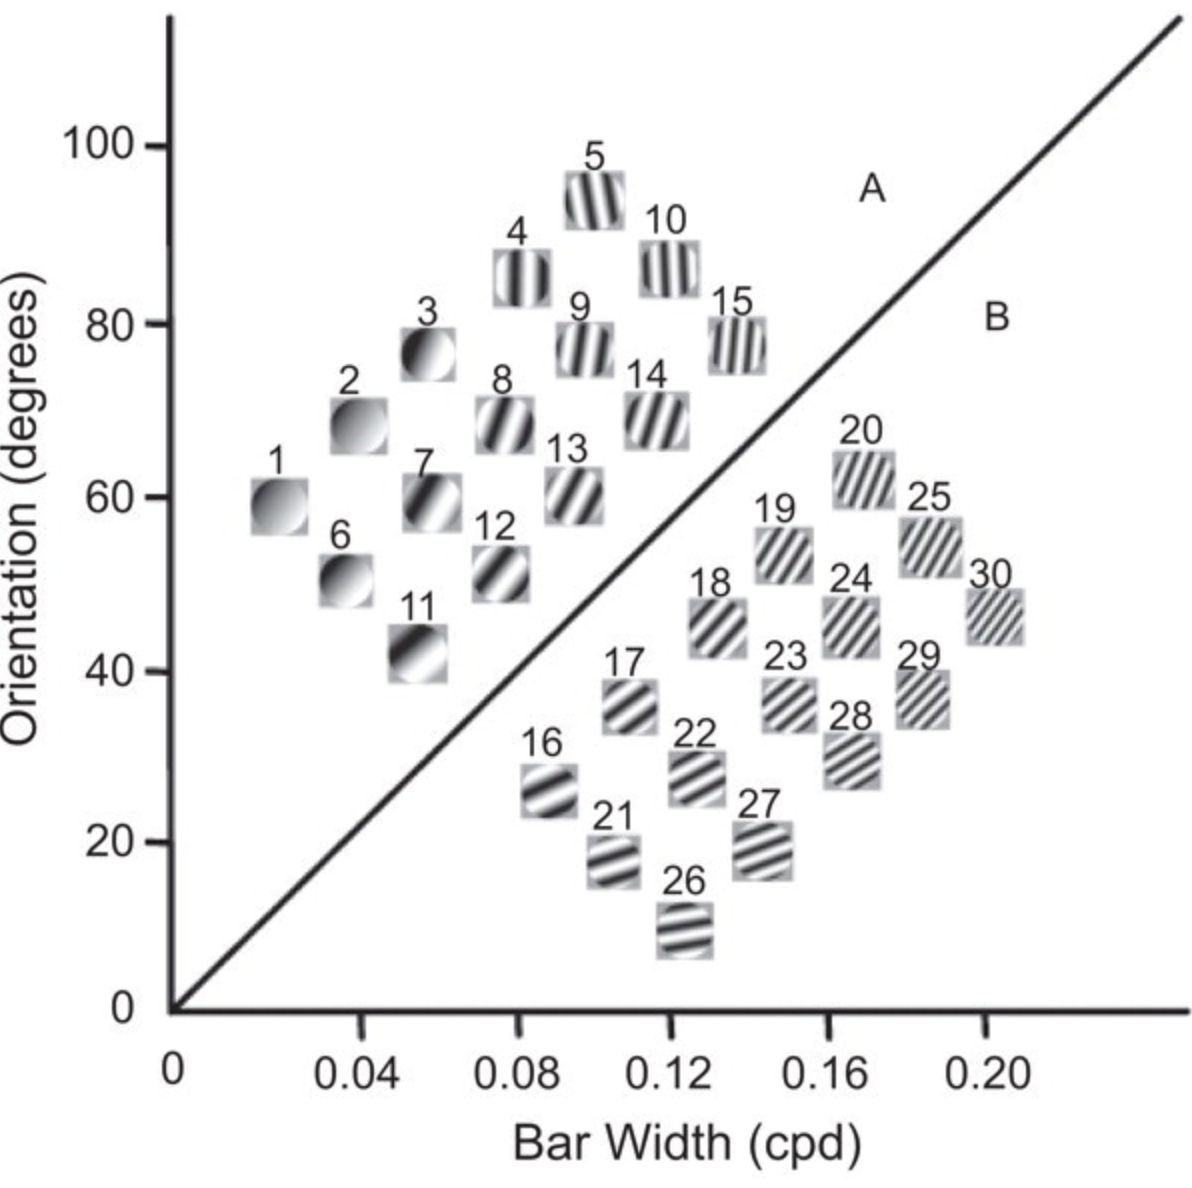
In this task, participants learn to categorize these 30 patches (visual stimuli that vary across trials in bar width and bar orientation) into 2 categories, A and B (the boundaries of which are denoted by the thick line in the figure), by trial and error. The feedback of “correct” and “incorrect” is provided after each choice and guides learning in the subsequent trials.
A new script
Create a new Inquisit script file and name it
wpa_4_FirstLast.iqx (with your First and Last name). This
is the file you will email me at the end of the class.
Now that you have a script file, define a defaults element at the beginning of the file (as you did in WPA3).
1. Define the choice stimuli
Just like we used the item element to define our text
strings last week, we can use the item element this week to
load our image files. The way we do this is by specifying the filepath
for each image, where we specified the text string last week. This
filepath is from the location your Inquisit script is saved
in. Therefore, if your image files are saved in the same
location as your .iqx file, you just have to give the file
name. For example:
<item example>
/1="patch1.png"
/2="patch2.png"
</item>
Otherwise, if they are in a sub-folder named for example “stimuli_wpa4”, you will write:
<item example>
/1="stimuli_wpa4/patch1.png"
/2="stimuli_wpa4/patch2.png"
</item>
An alternative to this method is to load stimuli lists from a text file. I prepared a stimulus list text file in the folder, in case you’d like to try that out.
Last week we had a single item element. Now we have two categories of stimuli, category A and category B. In our design, we need to be able to provide feedback to participants on whether they were correct or not during the training phase of the Experiment. This means that we need to be able to tell Inquisit which category each item is in, so that it can provide the appropriate feedback based on the participants response. This requires two separate stimuli lists, for A and B items.
Exercise 1a: Create your stimuli lists. Give each
list an informative name (e.g., stimlistA and
stimlistB).
Just like with the text elements, now that we have defined our
stimuli, we need to specify how they should look when displayed on the
screen. Because our stimuli are pictures, not text, we can do this by
defining a picture element. This element has an
items attribute and a select attribute, just
like the text element, as well as attributes for defining
location, size etc.
Exercise 1b: Based on your text code
from last week, create the appropriate picture elements, so
that the stimuli are displayed in the center of the screen (use the help
function if you want a reminder on what the position, items, and select
attributes do). You can also change other attributes of the image being
displayed. I recommend changing the size of the image as well.
NOTE: We need as many picture elements as we have item elements, even though all pictures will be displayed in the same way.
2. Define the Trials
Exercise 2a: Create a trial element for each of our
stimuli types, similar to the ones from last week. The valid responses
for all elements should be a and b.
In the paper, there is a break of 1500ms between each trial. Build
this into your trial elements. Last week we controlled how much time
there was between each trial by using the stimulustimes
attribute of the trial element. This is useful if we want to display
something during that time (for example: a warning to get ready, or a
fixation cross). However, we can also explicitly tell Inquisit to pause
between trials, using either the pretrialpause attribute or
the posttrialpause attribute. The first of these prepares
the trial, but then waits the designated time before beginning it. This
can be advantageous if it takes Inquisit some time to prepare the next
trial (e.g., it has to load large stimuli, or do calculations), because
it ensures that their is a consistent time gap between trials.
Exercise 2b: Try setting the pause between trials of
1500 ms using pretrialpause.
Now we have to tell Inquisit what counts as the correct response on each trial.
Exercise 2c: Look at the help file for the trial element, and see if you can work out how to set the correct response for each trial type.
Inquisit can display information that is dependent on participants’
choices in several ways. The simplest is to display a message based on
the response they gave. There are 3 main message attributes,
correctmessage, errormessage and
responsemessage. We will use the first 2. Each of these,
takes two pieces of information: the name of the stimulus that is
displayed as the message, and the length of time for which it should be
displayed.
This means that we need to create some stimuli for Inquisit to display. We’ll just create text stimuli for both messages. When they get a category right, I want to display the word Correct! in large font colored blue, when they get the category wrong, it should display Incorrect! in red instead.
Exercise 2d: Create the text elements
to do this. Then, use the correctmessage and
errormessage attributes to tell each trial how to use these
two text stimuli. You’ll need to do this for each trial
type.
3. Define the Block and Experiment
For simplicity, we will just have 1 block of 30 trials, where we randomize the category A and B stimuli.
Exercise 3a: Create 1 block and 1 experiment elements. To find out how to randomly select from 2 trial types, check the examples in the Inquisit help page for the block element.
Testing the code
Congratulations, you should now have a working Experiment. Try it out before you attempt the rest of the Exercises.
4. Final message
Now that you have a working experiment and you have gone through it
once, you can check the data output. You should see a
correct column, which is 0 when the response was incorrect
and 1 when the response was correct.
We now want to summarize participants’ performance and show it at the end of the experiment in a text message.
For this purpose, we need to introduce the values
element, which contains custom variables that can be retrieved and
updated throughout the course of a script.
Exercise 4a: Create a variable inside the values
element, call it accuracy and set it at an initial value of
50.
Now we need to update such variable after each trial, to reflect the
performance up to that point. First, the trial element has 2 attributes
called ontrialend and ontrialbegin, inside
which we can specify operations that we want to be performed before or
after each trial. In this case, we will use the ontrialend
attribute alone. Second, each trial object already has a few values
attached to it that can be “called” for various computations, as well as
directly added as a column in the output data.
Exercise 4b: Within the squared brackets of the
ontrialend attribute of trial A, type the label of that
trial, followed by a dot, and press the tab key. You should be able to
see now all the values that are attached to that object. Look for one
that represents the percentage of correct responses and press enter.
Now, within the squared brackets, redefine the accuracy variable to this
value (to assign a value to a variable, use the notation:
variable = value). NOTE: if you only use
the percentage of correct recorded by the same trial, the final
percentage correct which will be displayed will be the performance in
the final trial category that the participant saw. Therefore, we need to
calculate the average between the average performance in trial A and B
to define the values.accuracy variable. Be sure that you do
the same in both trial types.
Finally, we need to create a page, using the page
element, that shows the final value of the accuracy variable:
<page final_message>
Congratulations!

^^ You finished the experiment.

^^ You maintaned a performance of <%values.accuracy%> percent.
</page>
The page element is used to define simple pages of text to be
displayed as instructions using the preinstructions or
postinstructions attribute (you can use these both at the
block and experiment level). Tab and space characters occuring within
the page definition will also appear in the instruction page as
displayed. Line breaks, however, are stripped out prior to display. To
force a line break, use the special character “^”.
The current value of a given measure for a given trial or block (as
well as custom values, as in our case) can be inserted anywhere within
the text of an instruction page by specifying the type of element,
element’s name, and the name of the measure
(<% type.name.property %>) or in case of a custom
variable by specifying values and the name of the variable
(<%values.accuracy%>).
Exercise 4c: Add this page at the end of the block,
using the postinstructions attribute.
Inquisit provides built-in support for reporting accuracy, latency
and response window measures at the end of a block of trials using the
blockfeedback attribute (find it in the Inquisit Help).
Exercise 4d: Use the blockfeedback
attribute instead of our custom page to show the percentage of correct
responses at the end of the block.
Difference between variables and Parameters (clarification)
Today, we mentioned two new element types in Inquisit, variables and parameters.
We use parameters to fix some values at the beginning of the script that we would then use multiple times throughout the script. For example:
<parameters>
/ pictures_size = 30%
/ pictures_position = 50%
</parameters>

<picture A>
/ items = stimlistA
/ select = noreplace
/ position = (parameters.pictures_position, parameters.pictures_position)
/ size = (parameters.pictures_size, parameters.pictures_size)
</picture>

<picture B>
/ items = stimlistB
/ select = noreplace
/ position = (parameters.pictures_position, parameters.pictures_position)
/ size = (parameters.pictures_size, parameters.pictures_size)
</picture>
On the other hand, we use values to define variables whose values changed throughout the script (as accuracy in today’s task).
Send me your assignments
You can send your assignment to my email address: laura.fontanesi@unibas.ch.
For this assignment, please send me the Inquisit script. If you want
to add comments, you can do that by adding the hashtag # at
the beginning of the line.